 Dealers advertise all the time, even when you’re not looking. Those license plate frames, badges or decals they put on your car when they sell it, those are advertisements. Any time someone sees your car, they’ll also notice where you bought it. Sometimes, such as the case with my 2010 Maxima, Nissan saw fit to put the model name in chrome block letters on the left-hand side of the trunk lid, but nothing on the right-hand side to balance it out. Click past the jump for a painless way of removing unwanted badges. As a demonstration, I will be removing the letters that spell “MAXIMA” on the trunk lid of my own car.
After seeing a lot of people scratch the finish their car using the wrong tools, or struggle because they didn’t know the tricks, I’ve developed a 4-step process which is pretty easy to accomplish with great results. After following the steps listed below, your car’s finish should be nice & shiny, as well as free of the undesired badging.
Before you get started:
Note: Removing badges/lettering should be done sooner rather than later – if you wait too long, the paint not covered by the badging may have faded slightly, which will leave a “ghost” image of the badge when you’re done. If the offending badge has only been on your car a few months, any fading will be minimal and will even out after a couple weeks.

1. Make sure you have plenty of light to work with, to make sure you can complete each step.
2. Gather the proper tools:
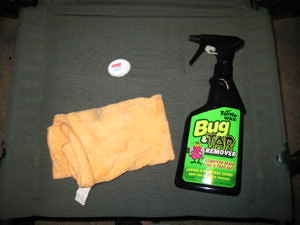
- Microfiber cloth (should be clean to prevent scratching your car’s finish).
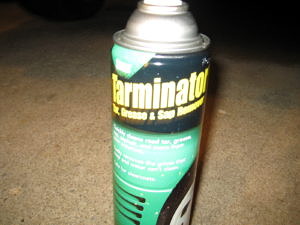
- Bug & Tar remover. I used a combination of Turtle Wax’s product, as well as Stoner’s brand “Tarminator”, the latter of which worked best.
- Dental Floss or fishing line (monofilament). Either will work, although you’ll probably go through more dental floss. Dental floss is also easier on your hands, which is why I used it in this case.
- Extra set of hands (not required, but can be helpful for catching falling badges before they hit your car’s paint or the ground).
Step 1: Clean and Dry the Vehicle
This step is very important, since you’ll be rubbing your microfiber cloth on the car, you don’t want to be rubbing dirt and grime into your paint.
Step 2: Remove the Badge / Lettering


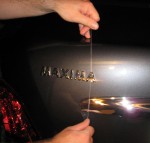
Using the dental floss or fishing line and a sawing motion, work from one side to the other of each badge to be removed. Take your time, don’t “saw” too quickly, and only apply gentle pressure in the direction you’re moving. I moved right-to-left on each letter, so I applied only slight pressure towards the left side of the car. The dental floss works fairly quickly through the adhesive holding the letters on, and only a minute or so was required to remove each letter.
Step 3: Clean off Remaining Adhesive

Once you’re done removing the letters/badges, some or a lot of adhesive will still be left on the car. This shows you’ve done the job correctly so far, as the adhesive provided a barrier between your dental floss and the car’s finish. Liberally apply the bug and tar remover to the adhesive and let it sit 30 seconds to 1 minute. After that time, use your microfiber cloth to rub at the adhesive. You should feel the adhesive becoming slick and malleable, and chunks of it should be removed. Once the adhesive feels like it’s starting to stick to your cloth, stop and reapply your bug & tar remover. Repeat this as long as necessary (usually 5-7 applications) or until no more adhesive remains.
Step 4: Wax the affected area

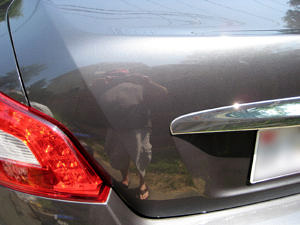
At this point, your car’s paint should remain unscratched, the badge(s) or letters should be gone, as well as any adhesive used to hold them on, and the area you were working on should be slightly duller than the rest of the car (the area that had adhesive on it never received any wax). Using your favorite wax and applicator, apply a coat or two of wax to the entire area that you were working on, making sure to get any area that came into contact with your bug & tar remover.
With Step 4 complete, you should be all done! Remember, this process doesn’t apply to removing vinyl, only to removing hard badges and lettering on your car. It’s a good idea to check with the dealer or an Internet forum (such as www.maxima.org for Nissan Maxima owners) to make sure there isn’t a hole behind whatever you’re trying to remove. In the case of the Ford Mustang, Ford used holes stamped into the front fenders to align the “running pony” or “GT” emblem for many years.
Before:
After:
by John Suit
With assistance from Mike Valente


I just bought a 2010 Maxima and removed the lettering as well. I used a very thin flat head screwdriver wrapped in a soft cloth and just popped each letter off…I like the dental floss idea a LOT better though. Great How-To!
I’ve had my 09 Maxima for about 14 months now. Do you think it is too late to remove the Nissan Emblem from the trunk?
good write-up, need remove the 3.5 from my 6th gen maxima….this is just waht i needed!
It may leave a ghost effect behind, but over time the paint underneath should fade to match. It may also help if you use a polishing compound and wax on the area underneath the badges. If you do it, send me pictures and let me know how it worked out for you!
-John
Thanks for the write up! Followed your instructions and my Max is looking much better!
I have a 2010 SV and want to remove the Front and rear emblems. Any how to links?